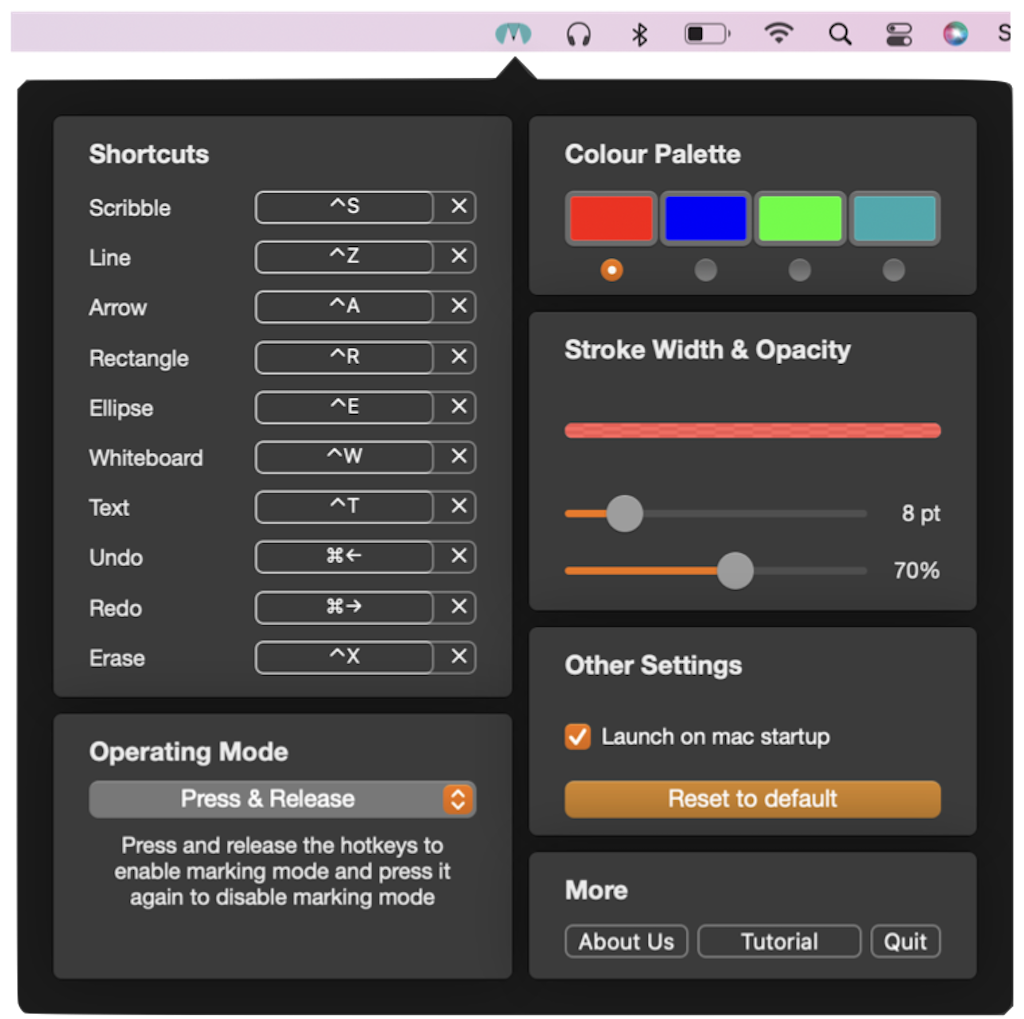
Click on the menu bar
icon to open up the menu as a popover. Click the icon again to close the menu. You can also click outside the menu or press ESC key to close it. The menu consists of different sections which are used for customisation. Customisations are done in different sections by user which are saved persistently across the app when launched.

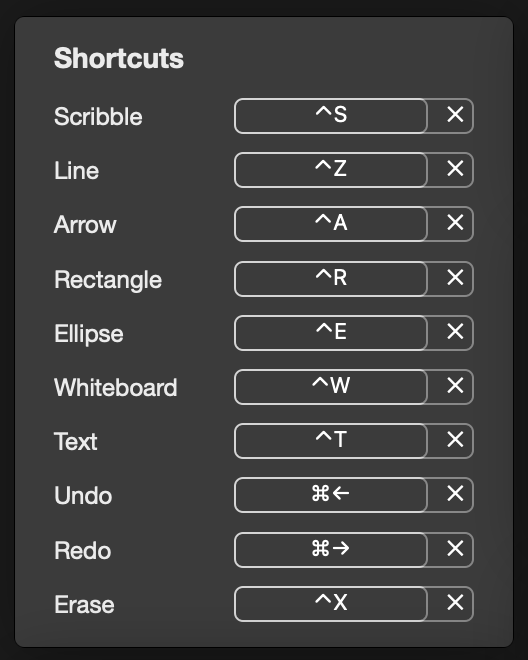
A complete set of marking tools is supported — Scribble, Line, Arrow, Rectangle, Ellipse, Text, Fading Scribble, AI Draw and Magnifier. A Whiteboard tool is also provided, which draws over other recent apps. To clear all the markings made on the screen we also provide an erase option. Scribbling provides a free hand marking tool which enables you to draw any shapes and annotate contents on the screen. Line can be utilised to annotate a graph or sentences to show their importance. Arrow draws your audience's attention to something specific. Rectangle spots out a paragraph or a portion of content you want your audience to focus on, and Ellipse highlights a specific area. Text tool adds text on screen above any webpage, documents or apps. Fading Scribble draws strokes that gracefully fade away on their own — no erasing needed. AI Draw converts your rough freehand stroke into a perfect clean shape automatically. Magnifier zooms into the screen under your cursor, live. Last but not the least, the whiteboard provides a space to elaborate and summarise your thought process using all the above tools embedded.
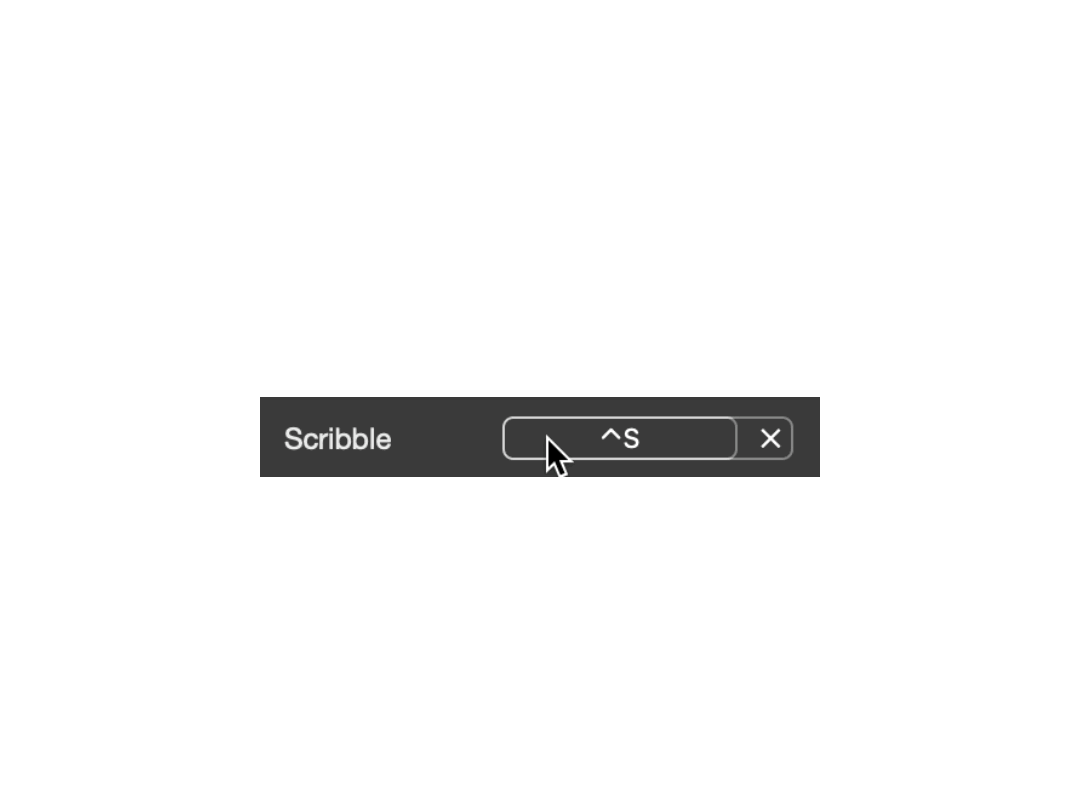
Shortcuts, also referred as hotkeys are used to activate the above marking tools. Initially each tool is provided with some default hotkeys. Each shortcut commands provides freedom of customising the hotkeys based on user suitability and convenience. You are recommended to record a new hotkey so that activation of marking tools can be handy.

Each hotkeys takes a modifier (control - ⋀ , shift - ⇧ , option - ⌥ , command - ⌘) as a prefix, followed by other keys as per your choice. For recording a new hotkey for a specific tool, click on the shortcut key button, when the “Type New Shortcut” command is prompted inside the button, press one of the modifier keys followed by other keys in the keyboard. As you press the keys the same gets displayed on the button. User can have any number of key combinations as their shortcut/hotkey.

Every tool works out of the box with these hotkeys — all fully customisable.
| Tool | Shortcut |
|---|---|
| Scribble | ⌃ Control + S |
| Fading Scribble | ⌃ Control + F |
| AI Draw | ⌃ Control + I |
| Magnifier | ⌃ Control + M |
| Line | ⌃ Control + Z |
| Arrow | ⌃ Control + A |
| Rectangle | ⌃ Control + R |
| Ellipse | ⌃ Control + E |
| Text | ⌃ Control + T |
| Whiteboard | ⌃ Control + W |
| Erase all | ⌃ Control + X |
| Undo / Redo | ⌘ Command + ← / → |
| Colours (Red, Blue, Green, Cyan, Yellow) | ⌃ Control + D / B / G / C / Y |
Operating modes govern the rule to activate the marking mode. Activating the marking mode enables you to mark and scribble with the available tools on the screen using tool’s corresponding hotkeys. A small circle appears above the tip of the mouse cursor (
) confirms the activation of marking mode. .
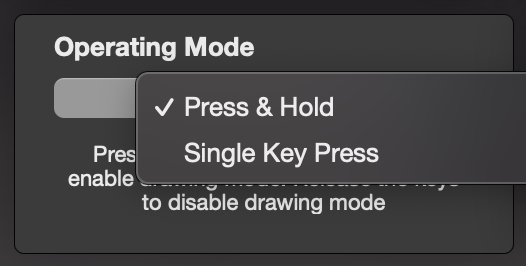
The two types of operating modes are Press & Hold and Press & Release.
Press & Hold Mode - When this mode is selected from the drop-down list, you can activate the marking mode and start marking by pressing and holding the hotkeys. The moment you release the hotkeys the marking mode is disabled. In this mode different tools can be switched by releasing the currently pressed hotkey and then pressing and holding the other tool’s hotkeys. This operating mode is useful when you are in middle of a presentation and want to annotate some content in the screen quickly.
Press & Release Mode - When this mode is selected from the drop down list, you can activate the marking mode by pressing the hotkeys once but unlike the above mode, marking mode still stays enabled after the release of the hotkeys. The marking mode can only be disabled when you press the hotkey the second time. In this mode you can switch different tools while marking mode is enabled. Don’t get perplexed, and just press any tool’s corresponding hotkey two time to disable, in case you can’t recall which is the latest hotkey you pressed to enable the marking mode. In this mode the small circle on tip of the mouse pointer (
) will let you know when the marking mode is enabled or disabled.
Irrespective of any operating mode you select, the markings and scribblings made when marking mode was active will still remain in the screen unless you erase this markings from the screen by using erase tool.
Anomaly - Erase tool and whiteboard are not governed by the above operating modes. The process of enabling these two tools is the same in both modes.
Erase option is used for clearing all the markings made in the screen will work by simply pressing the hotkey assigned for erase option.
Whiteboard will appear on the screen once you simply press its corresponding hotkey. Once the whiteboard is activated, the marking mode gets activated by default and is confirmed by
. Accordingly, the user can annotate his thoughts by using various tools available. Erase tool can be used to clear the whiteboard. User can only exit from the whiteboard by pressing again the hotkey/shortcut assigned for whiteboard.
The latest updates bring smarter, more powerful annotation tools.
Draw any shape roughly by freehand and watch it instantly snap into a clean line, arrow, circle or rectangle. All recognition happens locally on your Mac — fast and private.
Hold a shortcut to magnify the screen under your cursor in a circular loupe — perfect for highlighting fine details during presentations and screen sharing.
Erase exactly what you touch. The eraser removes only the part of a stroke it crosses — not the whole drawing — with a circle cursor showing the exact erase radius.
Strokes that gracefully fade away on their own after you draw them — annotate continuously without ever stopping to erase.
A grid overlay on the whiteboard helps with alignment and precision drawing — keep your sketches neat and structured.
Drop images onto the whiteboard, then drag and resize them smoothly — annotate over screenshots, diagrams and photos.